7.3.1.4. Configuring a slave nameserver
Once you have configured a master nameserver for a zone, you can configure another computer to fetch the zone information from that master nameserver and serve it to other machines. This can be done to share the workload for extremely busy domains or (more often) to provide some redundancy in case the master server is down or unreachable.
There is little point configuring a second nameserver if all of your services (mail server, web server, and so on) are on one server and that is the same machine that runs your master nameserver, because a failure or overload on that system would effectively cripple the other services along with the nameserver (and there is no value in being able to reach a server that can't provide service).
This type of nameserver is called a slave , but it is still considered authoritative for the domain if there is an NS record for it in the zone.
You may need to adjust your SELinux configuration to use slave zones (see Lab 8.2, "Using SELinux").
To configure a slave nameserver graphically, start the graphical configuration tool ( Figure 7-6 ), highlight the DNS Server entry, click on the New icon, and then click on the Zone option from the pull-down list. Create the zone in the same way you did on the master server, but set the Zone Type to "slave." Click OK, and the window shown in Figure 7-12 will appear.
Figure 7-12. Slave zone configuration window
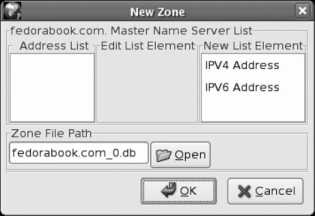
Click on IPV4 Address, and the window will change to include fields for the IP address, as shown in Figure 7-13 .
Figure 7-13. Slave zone configuration window with address fields
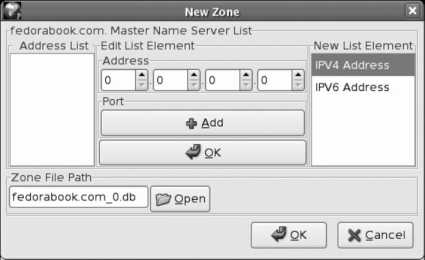
Enter the IP address of the master nameserver, and then click on the upper OK button followed by the lower OK button. Click on the Save button on the main window, and the slave zone will be created.
To configure a slave zone by editing the configuration files, add a section to /var/named.conf that looks like this:
zone " fedorabook.com " IN {
type slave;
file " fedorabook.com.db ";
masters { 216.183.93.224 ; };
};
The zone and file values are the same as for a master zone. The type must be set to slave , and the masters value is a semicolon-separated list of zone master nameservers, enclosed in curly braces.
Once you have configured the slave zone, restart or reload named on the same machine. The initial zone transfer should be recorded in /var/log/messages :
zone fedorabook.com/IN: Transfer started.
transfer of 'chris.com/IN' from 216.183.93.224#53: connected using 47.52.6.120#55096
zone fedorabook.com/IN: transferred serial 2